ASP .NET Core 3.0
是做Web开发的框架。
https://www.bilibili.com/video/BV1c441167KQ
官网:https://docs.microsoft.com/zh-cn/aspnet/core/migration/proper-to-2x/?view=aspnetcore-2.2
官网:https://docs.microsoft.com/zh-cn/aspnet/core/fundamentals/startup?view=aspnetcore-5.0
Startup.cs
Startup 必须包含 Configure 方法。
使用Startup (IHostBuilder) 时,只能将以下服务类型注入 Startup 构造函数:
在调用 Configure 方法之前,大多数服务都不可用。
public Startup(IConfiguration configuration)
{//注入IConfiguration
    Configuration = configuration;
}

public IConfiguration Configuration { get; }
Configure
创建应用的请求处理管道
请求管道中的每个中间件组件负责调用管道中的下一个组件,或在适当情况下使链发生短路。
// This method gets called by the runtime. Use this method to configure the HTTP request pipeline.
public void Configure(IApplicationBuilder app, IHostingEnvironment env)
{
    if (env.IsDevelopment())
    {
        app.UseDeveloperExceptionPage();
    }

    app.Run(async (context) =>
    {
        await context.Response.WriteAsync("Hello World!");
    });
}
ConfigureServices
配置应用的服务。 服务是一个提供应用功能的可重用组件。 在 中注册服务,并通过依赖关系注入 (DI) 或 在整个应用中使用服务。
将服务添加到服务容器,使其在应用和 Configure 方法中可用。 服务通过依赖关系注入或 进行解析。
public void ConfigureServices(IServiceCollection services)
{

}
Program
在构建应用Startup时指定 Startup 类。 通常通过在主机生成器上调用 WebHostBuilderExtensions.UseStartup/<TStartup> 方法来指定 Startup 类:
public class Program
{
    public static void Main(string[] args)
    {
        CreateHostBuilder(args).Build().Run();
    }

    public static IHostBuilder CreateHostBuilder(string[] args) =>
        Host.CreateDefaultBuilder(args)
            .ConfigureWebHostDefaults(webBuilder =>
            {
                webBuilder.UseStartup<Startup>();
            });
}
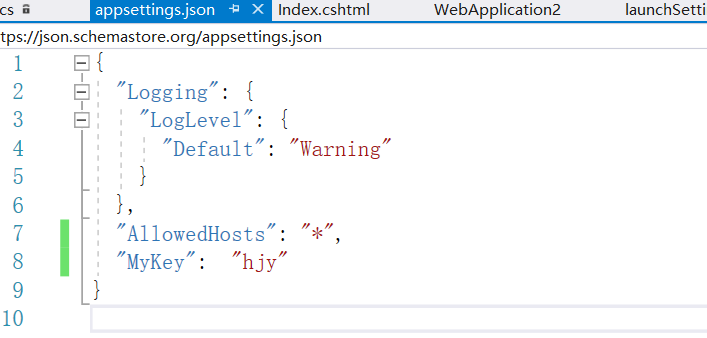
appsettings.json
ASP.NET Core 可以将应用程序的配置数据存储在任何文件中,并可在启动中间件的过程中加载它们。 项目模板中使用的默认文件是 appsettings.json
{
  "Logging": {
    "LogLevel": {
      "Default": "Warning"
    }
  },
  "AllowedHosts": "*"
}
将此文件加载到应用程序内部的 IConfiguration 实例中完成以下操作 Startup.cs:
using Microsoft.Extensions.Configuration;

public Startup(IConfiguration configuration)
{
    Configuration = configuration;
}

public IConfiguration Configuration { get; }
应用读取 Configuration 来获得这些设置:
string userName = Configuration.GetSection("AppConfiguration")["UserName"];
string password = Configuration.GetSection("AppConfiguration")["Password"];
//==TODO==
此方法有扩展项,它们可使此过程更加可靠,例如使用依存关系注入 (DI) 来加载使用这些值的服务。 DI 方法提供了一组强类型的配置对象。
// Assume AppConfiguration is a class representing a strongly-typed version of AppConfiguration section
services.Configure<AppConfiguration>(Configuration.GetSection("AppConfiguration"));
依赖关系注入
ASP.NET Core 支持依赖关系注入 (DI) 软件设计模式,这是一种在类及其依赖关系之间实现控制反转 (IoC) 的技术。
优点:
- 使用接口或基类将依赖关系实现抽象化。
- 在服务容器中注册依赖关系。ASP.NET Core 提供了一个内置的服务容器 IServiceProvider。 服务通常已在应用的
Startup.ConfigureServices方法中注册。 - 将服务注入到使用它的类的构造函数中。框架负责创建依赖关系的实例,并在不再需要时将其释放。
例子
IMyDependency接口:
public interface IMyDependency
{
    void WriteMessage(string message);
}
此接口由具体类型 MyDependency 实现:
public class MyDependency : IMyDependency
{
    public void WriteMessage(string message)
    {
        Console.WriteLine($"MyDependency.WriteMessage Message: {message}");
    }
}
使用具体类型 MyDependency 注册 IMyDependency 服务。 AddScoped 方法使用范围内生存期(单个请求的生存期)注册服务。
public void ConfigureServices(IServiceCollection services)
{
    services.AddScoped<IMyDependency, MyDependency>();

    //services.AddRazorPages();
}
请求 IMyDependency 服务并用于调用 WriteMessage 方法:
public class Index2Model : PageModel
{
    private readonly IMyDependency _myDependency;

    public Index2Model(IMyDependency myDependency)
    {
        _myDependency = myDependency;
    }

    public void OnGet()
    {
        _myDependency.WriteMessage("Index2Model.OnGet");
    }
}
扩展方法注入
演示如何使用扩展方法 AddDbContext 和 AddDefaultIdentity 将其他服务添加到容器中:
可以将相关的注册组移动到扩展方法以注册服务。 例如,配置服务会被添加到以下类中:
using ConfigSample.Options;
using Microsoft.Extensions.Configuration;

namespace Microsoft.Extensions.DependencyInjection
{
    public static class MyConfigServiceCollectionExtensions
    {
        public static IServiceCollection AddConfig(
             this IServiceCollection services, IConfiguration config)
        {
            services.Configure<PositionOptions>(
                config.GetSection(PositionOptions.Position));
            services.Configure<ColorOptions>(
                config.GetSection(ColorOptions.Color));

            return services;
        }

        public static IServiceCollection AddMyDependencyGroup(
             this IServiceCollection services, IConfiguration config)
        {
            return services;
        }
    }
}
剩余的服务会在类似的类中注册。 下面的 ConfigureServices 方法使用新扩展方法来注册服务:
public void ConfigureServices(IServiceCollection services)
{
    services.AddConfig(Configuration)
        .AddMyDependencyGroup();
}
每个 services.Add{GROUP_NAME} 扩展方法添加并可能配置服务。
生存期和注册选项
记录器输出显示:
- 暂时性对象始终不同。
IndexModel和中间件中的临时OperationId值不同。 - 范围内对象对给定请求而言是相同的,但在每个新请求之间不同。
- 单一实例对象对于每个请求是相同的。
范围内服务必须在 InvokeAsync 方法中进行解析:
public async Task InvokeAsync(HttpContext context,
    IOperationScoped scopedOperation)
{
    _logger.LogInformation("Transient: " + _transientOperation.OperationId);
    _logger.LogInformation("Scoped: "    + scopedOperation.OperationId);
    _logger.LogInformation("Singleton: " + _singletonOperation.OperationId);

    await _next(context);
}
服务器
Kestrel 服务器是默认跨平台 HTTP 服务器实现。 Kestrel 提供了最佳性能和内存利用率,但它没有 HTTP.sys 中的某些高级功能。 有关详细信息,请参阅下一部分中的 Kestrel 与 HTTP.sys。
使用 IIS 或 IIS Express 时,应用会在以下其中一个进程中运行:
- 在使用 IIS HTTP 服务器的 IIS 工作进程(进程内托管模型)相同的进程中。 “进程内”建议的配置。
- 在独立于 IIS 工作进程(进程外托管模型)和 Kestrel 服务器的进程中。
Kestrel 与 HTTP.sys
Kestrel 具有以下优势:
- 更好的性能和内存利用率。
- 跨平台
- 灵活性,它是独立于操作系统进行开发和修补的。
- 编程端口和 TLS 配置
- 扩展性,允许 PPv2 等协议和备用传输。
Http.Sys 作为共享内核模式组件运行,具有 kestrel 不具备的以下功能:
- 端口共享
- 内核模式 Windows 身份验证。 Kestrel 仅支持用户模式的身份验证。
- 通过队列传输的快速代理
- 直接文件传输
- 响应缓存
托管模型
使用进程内托管,ASP.NET Core 在与其 IIS 工作进程相同的进程中运行。 进程内承载相较进程外承载提供更优的性能,因为请求并不通过环回适配器进行代理,环回适配器是一个网络接口,用于将传出的网络流量返回给同一计算机。IIS 使用 Windows 进程激活服务 (WAS) 处理进程管理。
通过进程外托管,ASP.NET Core 应用在独立于 IIS 工作进程的进程中运行,而由模块来处理进程管理。 该模块在第一个请求到达时启动 ASP.NET Core 应用的进程,并在应用关闭或崩溃时重新启动该应用。 这基本上与在 Windows 进程激活服务 (WAS) 托管的进程内运行的应用中出现的行为相同。 使用单独的进程还可以托管同一个应用池中的多个应用。
Kestrel
使用 Kestrel:
本身作为边缘服务器,处理直接来自网络(包括 Internet)的请求。
与反向代理服务器(如 Internet Information Services (IIS)、Nginx 或 Apache)结合使用。 反向代理服务器接收来自 Internet 的 HTTP 请求,并将这些请求转发到 Kestrel。
HTTP.sys
如果 ASP.NET Core 应用在 Windows 上运行,则 HTTP.sys 是 Kestrel 的替代选项。 与 HTTP.sys 相比,建议使用 Kestrel,除非应用需要 Kestrel 未提供的功能。 有关详细信息,请参阅 ASP.NET Core 中的 HTTP.sys Web 服务器实现。
对于仅向内部网络公开的应用,HTTP.sys 同样适用。
有关 HTTP.sys 配置指南,请参阅 ASP.NET Core 中的 HTTP.sys Web 服务器实现。
中间件
中间件是一种装配到应用管道以处理请求和响应的软件。 每个组件:
- 选择是否将请求传递到管道中的下一个组件。
- 可在管道中的下一个组件前后执行工作。
每个委托均可在下一个委托前后执行操作。 应尽早在管道中调用异常处理委托,这样它们就能捕获在管道的后期阶段发生的异常。
尽可能简单的 ASP.NET Core 应用设置了处理所有请求的单个请求委托。 这种情况不包括实际请求管道。 调用单个匿名函数以响应每个 HTTP 请求。
public class Startup
{
    public void Configure(IApplicationBuilder app)
    {
        app.Run(async context =>
        {
            await context.Response.WriteAsync("Hello, World!");
        });
    }
}
用 Use 将多个请求委托链接在一起。 next 参数表示管道中的下一个委托。 可通过不调用 next 参数使管道短路。 通常可在下一个委托前后执行操作,如以下示例所示:
public class Startup
{
    public void Configure(IApplicationBuilder app)
    {
        app.Use(async (context, next) =>
        {
            // Do work that doesn't write to the Response.
            await next.Invoke();
            // Do logging or other work that doesn't write to the Response.
        });

        app.Run(async context =>
        {
            await context.Response.WriteAsync("Hello from 2nd delegate.");
        });
    }
}
中间件顺序
向 Startup.Configure 方法添加中间件组件的顺序定义了针对请求调用这些组件的顺序,以及响应的相反顺序。 此顺序对于安全性、性能和功能至关重要。
下面的 Startup.Configure 方法按照典型的建议顺序增加与安全相关的中间件组件:
public void Configure(IApplicationBuilder app, IWebHostEnvironment env)
{
    if (env.IsDevelopment())
    {
        app.UseDeveloperExceptionPage();
        app.UseDatabaseErrorPage();
    }
    else
    {
        app.UseExceptionHandler("/Error");
        app.UseHsts();
    }

    app.UseHttpsRedirection();
    app.UseStaticFiles();
    // app.UseCookiePolicy();

    app.UseRouting();
    // app.UseRequestLocalization();
    // app.UseCors();

    app.UseAuthentication();
    app.UseAuthorization();
    // app.UseSession();
    // app.UseResponseCompression();
    // app.UseResponseCaching();

    app.UseEndpoints(endpoints =>
    {
        endpoints.MapRazorPages();
        endpoints.MapControllerRoute(
            name: "default",
            pattern: "{controller=Home}/{action=Index}/{id?}");
    });
}
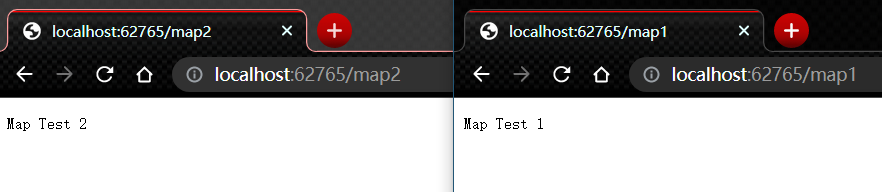
对中间件管道进行分支
Map 扩展用作约定来创建管道分支。 Map 基于给定请求路径的匹配项来创建请求管道分支。 如果请求路径以给定路径开头,则执行分支。
public class Startup
{
    private static void HandleMapTest1(IApplicationBuilder app)
    {
        app.Run(async context =>
        {
            await context.Response.WriteAsync("Map Test 1");
        });
    }

    private static void HandleMapTest2(IApplicationBuilder app)
    {
        app.Run(async context =>
        {
            await context.Response.WriteAsync("Map Test 2");
        });
    }

    public void Configure(IApplicationBuilder app)
    {
        app.Map("/map1", HandleMapTest1);

        app.Map("/map2", HandleMapTest2);

        app.Run(async context =>
        {
            await context.Response.WriteAsync("Hello from non-Map delegate. <p>");
        });
    }
}
Map 支持嵌套,例如:
app.Map("/level1", level1App => {
    level1App.Map("/level2a", level2AApp => {
        // "/level1/level2a" processing
    });
    level1App.Map("/level2b", level2BApp => {
        // "/level1/level2b" processing
    });
});
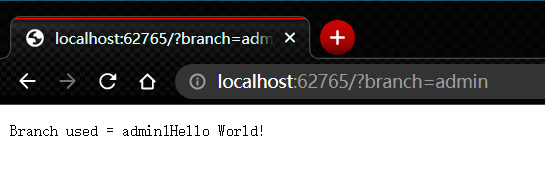
MapWhen 基于给定谓词的结果创建请求管道分支。 Func<HttpContext, bool> 类型的任何谓词均可用于将请求映射到管道的新分支。 在以下示例中,谓词用于检测查询字符串变量 branch 是否存在:
public class Startup
{
    private static void HandleBranch(IApplicationBuilder app)
    {
        app.Run(async context =>
        {
            var branchVer = context.Request.Query["branch"];
            await context.Response.WriteAsync($"Branch used = {branchVer}");
        });
    }

    public void Configure(IApplicationBuilder app)
    {
        app.MapWhen(context => context.Request.Query.ContainsKey("branch"),
                               HandleBranch);

        app.Run(async context =>
        {
            await context.Response.WriteAsync("Hello from non-Map delegate. <p>");
        });
    }
}
下表使用前面的代码显示来自 http://localhost:1234 的请求和响应:
| 请求 | 响应 |
|---|---|
| localhost:1234 | Hello from non-Map delegate. |
| localhost:1234/?branch=main | Branch used = main |
UseWhen 也基于给定谓词的结果创建请求管道分支。 与 MapWhen 不同的是,如果这个分支不发生短路或包含终端中间件,则会重新加入主管道:
public class Startup
{
    private void HandleBranchAndRejoin(IApplicationBuilder app)
    {
        app.Use(async (context, next) =>
        {
            var branchVer = context.Request.Query["branch"];
            await context.Response.WriteAsync($"Branch used = {branchVer}");

            // Do work that doesn't write to the Response.
            await next();
            // Do other work that doesn't write to the Response.
        });
    }

    public void Configure(IApplicationBuilder app, ILogger<Startup> logger)
    {
        app.UseWhen(context => context.Request.Query.ContainsKey("branch"),
                               appBuilder => HandleBranchAndRejoin(appBuilder));

        app.Run(async context =>
        {
            await context.Response.WriteAsync("Hello World!");
        });
    }
}
在前面的示例中,为所有请求写入“Hello from main pipeline.”响应。 如果请求中包含查询字符串变量 branch,则在重新加入主管道之前会记录其值。
主机
设置泛型主机
主机通常由 Program 类中的代码配置、生成和运行。 Main 方法:
- 调用
CreateHostBuilder方法以创建和配置生成器对象。 - 对生成器对象调用
Build和Run方法。
public class Program
{
    public static void Main(string[] args)
    {
        CreateHostBuilder(args).Build().Run();
    }

    public static IHostBuilder CreateHostBuilder(string[] args) =>
        Host.CreateDefaultBuilder(args)
            .ConfigureWebHostDefaults(webBuilder =>
            {
                webBuilder.UseStartup<Startup>();
            });
}
设置Web主机
创建使用 IWebHostBuilder 实例的主机。 通常在应用的入口点来执行 Main 方法。
在项目模板中,Main 位于 Program.cs 中。 典型应用调用 CreateDefaultBuilder 来开始创建主机:
public class Program
{
    public static void Main(string[] args)
    {
        CreateWebHostBuilder(args).Build().Run();
    }

    public static IWebHostBuilder CreateWebHostBuilder(string[] args) =>
        WebHost.CreateDefaultBuilder(args)
            .UseStartup<Startup>();
}
配置
ASP.NET Core 中的配置是使用一个或多个配置提供程序执行的。 配置提供程序使用各种配置源从键值对读取配置数据:
- 设置文件,例如
appsettings.json - 环境变量
- Azure Key Vault
- Azure 应用程序配置
- 命令行参数
- 已安装或已创建的自定义提供程序
- 目录文件
- 内存中的 .NET 对象
CreateDefaultBuilder 按照以下顺序为应用提供默认配置:
- ChainedConfigurationProvider:添加现有的
IConfiguration作为源。 在默认配置示例中,添加主机配置,并将它设置为应用配置的第一个源。 - 使用 JSON 配置提供程序通过 appsettings.json 提供。
- 使用 JSON 配置提供程序通过
appsettings.{Environment}.json提供。 例如,appsettings.Production.json和appsettings.Development.json。 - 应用在
Development环境中运行时的应用机密。 - 使用环境变量配置提供程序通过环境变量提供。
- 使用命令行配置提供程序通过命令行参数提供。
后来添加的配置提供程序会替代之前的密钥设置。 例如,如果 appsettings.json 和环境中都设置了 MyKey,则使用环境值。 通过默认配置提供程序,命令行配置提供程序将替代其他所有提供程序。
appsettings.json
请考虑以下 appsettings.json 文件:
{
  "Position": {
    "Title": "Editor",
    "Name": "Joe Smith"
  },
  "MyKey":  "My appsettings.json Value",
  "Logging": {
    "LogLevel": {
      "Default": "Information",
      "Microsoft": "Warning",
      "Microsoft.Hosting.Lifetime": "Information"
    }
  },
  "AllowedHosts": "*"
}
读取
public class TestModel : PageModel
{
    // requires using Microsoft.Extensions.Configuration;
    private readonly IConfiguration Configuration;

    public TestModel(IConfiguration configuration)
    {
        Configuration = configuration;
    }

    public ContentResult OnGet()
    {
        var myKeyValue = Configuration["MyKey"];
        var title = Configuration["Position:Title"];
        var name = Configuration["Position:Name"];
        var defaultLogLevel = Configuration["Logging:LogLevel:Default"];


        return Content($"MyKey value: {myKeyValue} \n" +
                       $"Title: {title} \n" +
                       $"Name: {name} \n" +
                       $"Default Log Level: {defaultLogLevel}");
    }
}
使用选项模式绑定分层配置数据
读取相关配置值的首选方法是使用选项模式。 例如,若要读取以下配置值,请执行以下操作:
"Position": {
    "Title": "Editor",
    "Name": "Joe Smith"
  }
创建以下 PositionOptions 类:
public class PositionOptions
{
    public const string Position = "Position";

    public string Title { get; set; }
    public string Name { get; set; }
}
选项类:
- 必须是包含公共无参数构造函数的非抽象类。
- 类型的所有公共读写属性都已绑定。
- 字段不是绑定的。 在上面的代码中,
Position未绑定。 由于使用了Position属性,因此在将类绑定到配置提供程序时,不需要在应用中对字符串"Position"进行硬编码。
显示 Position 配置数据。
public class Test22Model : PageModel
{
    private readonly IConfiguration Configuration;

    public Test22Model(IConfiguration configuration)
    {
        Configuration = configuration;
    }

    public ContentResult OnGet()
    {
        var positionOptions = new PositionOptions();
        Configuration.GetSection(PositionOptions.Position).Bind(positionOptions);

        return Content($"Title: {positionOptions.Title} \n" +
                       $"Name: {positionOptions.Name}");
    }
}
ConfigurationBinder.Get 绑定并返回指定的类型。 使用 ConfigurationBinder.Get<T> 可能比使用 ConfigurationBinder.Bind 更方便。 下面的代码演示如何将 ConfigurationBinder.Get<T> 与 PositionOptions 类配合使用:
public class Test21Model : PageModel
{
    private readonly IConfiguration Configuration;
    public PositionOptions positionOptions { get; private set; }

    public Test21Model(IConfiguration configuration)
    {
        Configuration = configuration;
    }

    public ContentResult OnGet()
    {
        positionOptions = Configuration.GetSection(PositionOptions.Position)
                                                     .Get<PositionOptions>();

        return Content($"Title: {positionOptions.Title} \n" +
                       $"Name: {positionOptions.Name}");
    }
}
在上面的代码中,默认读取在应用启动后对 JSON 配置文件所做的更改。
使用选项模式时的另一种方法是绑定 Position 部分,并将其添加到依赖关系注入服务容器中。 在以下代码中,PositionOptions 已通过 Configure 被添加到了服务容器并已绑定到了配置:
public void ConfigureServices(IServiceCollection services)
{
    services.Configure<PositionOptions>(Configuration.GetSection(
                                        PositionOptions.Position));
    services.AddRazorPages();
}
通过使用前面的代码,以下代码将读取位置选项:
public class Test2Model : PageModel
{
    private readonly PositionOptions _options;

    public Test2Model(IOptions<PositionOptions> options)
    {
        _options = options.Value;
    }

    public ContentResult OnGet()
    {
        return Content($"Title: {_options.Title} \n" +
                       $"Name: {_options.Name}");
    }
}
在上面的代码中,不会读取在应用启动后对 JSON 配置文件所做的更改。 若要读取在应用启动后的更改,请使用 IOptionsSnapshot。//TO==选项==
合并服务集合
请考虑下面的 ConfigureServices 方法,该方法可注册服务并配置选项:
public void ConfigureServices(IServiceCollection services)
{
    services.Configure<PositionOptions>(
        Configuration.GetSection(PositionOptions.Position));
    services.Configure<ColorOptions>(
        Configuration.GetSection(ColorOptions.Color));

    services.AddScoped<IMyDependency, MyDependency>();
    services.AddScoped<IMyDependency2, MyDependency2>();

    services.AddRazorPages();
}
可以将相关的注册组移动到扩展方法以注册服务。 例如,配置服务会被添加到以下类中:
using ConfigSample.Options;
using Microsoft.Extensions.Configuration;

namespace Microsoft.Extensions.DependencyInjection
{
    public static class MyConfigServiceCollectionExtensions
    {
        public static IServiceCollection AddConfig(
             this IServiceCollection services, IConfiguration config)
        {
            services.Configure<PositionOptions>(
                config.GetSection(PositionOptions.Position));
            services.Configure<ColorOptions>(
                config.GetSection(ColorOptions.Color));

            return services;
        }
    }
    //TODO:Test==
    public static IServiceCollection AddMyDependencyGroup(
             this IServiceCollection services)
        {
            services.AddScoped<IMyDependency, MyDependency>();
            services.AddScoped<IMyDependency2, MyDependency2>();

            return services;
        }
}
剩余的服务会在类似的类中注册。 下面的 ConfigureServices 方法使用新扩展方法来注册服务:
public void ConfigureServices(IServiceCollection services)
{
    services.AddConfig(Configuration)
            .AddMyDependencyGroup();

    services.AddRazorPages();
}
安全性和用户机密
配置数据指南:
- 请勿在配置提供程序代码或纯文本配置文件中存储密码或其他敏感数据。 机密管理器工具可用于存储开发环境中的机密。
- 不要在开发或测试环境中使用生产机密。
- 请在项目外部指定机密,避免将其意外提交到源代码存储库。
默认情况下,将在 JSON 配置源后注册用户机密配置源。 因此,用户机密密钥优先于 appsettings.json 和 appsettings.{Environment}.json 中的密钥。
存储数据库连接字符串
环境变量
所有平台上的环境变量分层键都不支持 : 分隔符。 __(双下划线):
- 受所有平台支持。 例如,Bash 不支持
:分隔符,但支持__。 - 自动替换为
:
以下 set 命令:
set MyKey="My key from Environment"
set Position__Title=Environment_Editor
set Position__Name=Environment_Rick
dotnet run
前面的环境设置:
- 仅在进程中设置,这些进程是从设置进程的命令窗口启动的。
- 不会由通过 Visual Studio 启动的浏览器读取。
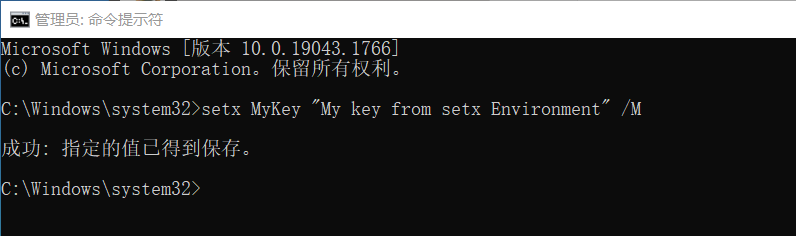
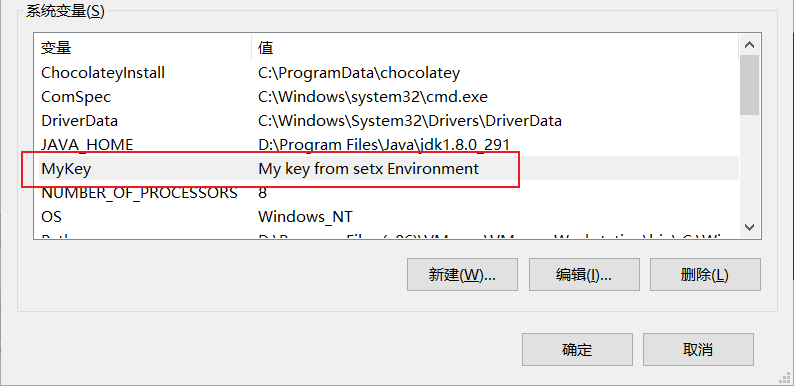
以下 setx 命令可用于在 Windows 上设置环境键和值。 与 set 不同,setx 设置是持久的。 /M 在系统环境中设置变量。 如果未使用 /M 开关,则会设置用户环境变量。
setx MyKey "My key from setx Environment" /M
setx Position__Title Environment_Editor /M
setx Position__Name Environment_Rick /M
使用字符串调用 AddEnvironmentVariables 以指定环境变量的前缀:
public class Program
{
    public static void Main(string[] args)
    {
        CreateHostBuilder(args).Build().Run();
    }

    public static IHostBuilder CreateHostBuilder(string[] args) =>
        Host.CreateDefaultBuilder(args)
            .ConfigureAppConfiguration((hostingContext, config) =>
            {
                config.AddEnvironmentVariables(prefix: "MyCustomPrefix_");
            })
            .ConfigureWebHostDefaults(webBuilder =>
            {
                webBuilder.UseStartup<Startup>();
            });
}
在上述代码中:
config.AddEnvironmentVariables(prefix: "MyCustomPrefix_")被添加到默认配置提供程序之后。 有关对配置提供程序进行排序的示例,请参阅 JSON 配置提供程序。- 使用
MyCustomPrefix_前缀设置的环境变量将替代默认配置提供程序。 这包括没有前缀的环境变量。
前缀会在读取配置键值对时被去除。
以下命令对自定义前缀进行测试:
set MyCustomPrefix_MyKey="My key with MyCustomPrefix_ Environment"
set MyCustomPrefix_Position__Title=Editor_with_customPrefix
set MyCustomPrefix_Position__Name=Environment_Rick_cp
dotnet run
默认配置会加载前缀为 DOTNET_ 和 ASPNETCORE_ 的环境变量和命令行参数。 DOTNET_ 和 ASPNETCORE_ 前缀会由 ASP.NET Core 用于主机和应用配置,但不用于用户配置。 有关主机和应用配置的详细信息,请参阅 .NET 通用主机。
环境变量的命名
环境变量名称反映了 appsettings.json 文件的结构。 层次结构中的每个元素由双下划线字符(更可取)或冒号分隔。 当元素结构包含数组时,应将数组索引视为此路径中的附加元素名称。 请考虑以下 appsettings.json 文件及其表示为环境变量的等效值。
appsettings.json
{
    "SmtpServer": "smtp.example.com",
    "Logging": [
        {
            "Name": "ToEmail",
            "Level": "Critical",
            "Args": {
                "FromAddress": "MySystem@example.com",
                "ToAddress": "SRE@example.com"
            }
        },
        {
            "Name": "ToConsole",
            "Level": "Information"
        }
    ]
}
环境变量
setx SmtpServer smtp.example.com
setx Logging__0__Name ToEmail
setx Logging__0__Level Critical
setx Logging__0__Args__FromAddress MySystem@example.com
setx Logging__0__Args__ToAddress SRE@example.com
setx Logging__1__Name ToConsole
setx Logging__1__Level Information
在生成的 launchSettings.json 中设置的环境变量
在 launchSettings.json 中设置的环境变量将替代在系统环境中设置的变量。 例如,ASP.NET Core Web 模板会生成一个 launchSettings.json 文件,该文件将终结点配置设置为:
"applicationUrl": "https://localhost:5001;http://localhost:5000"
配置 applicationUrl 将设置 ASPNETCORE_URLS 环境变量并重写环境中设置的值。
在 Linux 上转义环境变量
在 Linux 上,必须转义 URL 环境变量的值,使 systemd 可以对其进行分析。 使用 Linux 工具 systemd-escape 生成 http:--localhost:5001
groot@terminus:~$ systemd-escape http://localhost:5001
http:--localhost:5001
显示环境变量
下面的代码显示了应用程序启动时的环境变量和值,这对调试环境设置很有帮助:
public static void Main(string[] args)
{
    var host = CreateHostBuilder(args).Build();

    var config = host.Services.GetRequiredService<IConfiguration>();

    foreach (var c in config.AsEnumerable())
    {
        Console.WriteLine(c.Key + " = " + c.Value);
    }
    host.Run();
}
命令行
使用默认配置,CommandLineConfigurationProvider 会从以下配置源后的命令行参数键值对中加载配置:
appsettings.json和appsettings.{Environment}.json文件。- 开发环境中的应用机密。
- 环境变量。
默认情况下,在命令行上设置的配置值会替代通过所有其他配置提供程序设置的配置值。
命令行参数
以下命令使用 = 设置键和值:
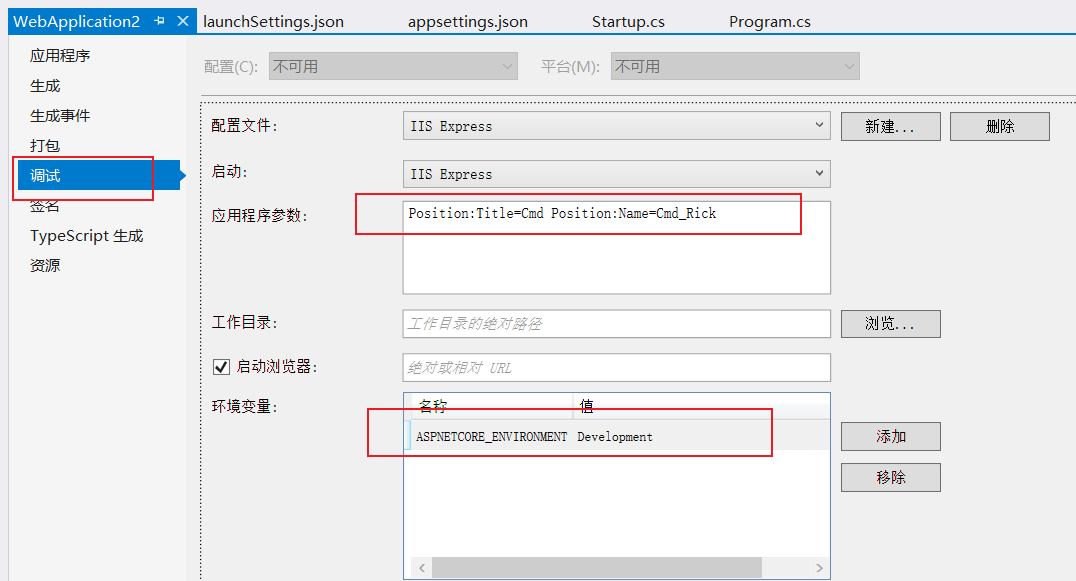
dotnet run MyKey="Using =" Position:Title=Cmd Position:Name=Cmd_Rick
以下命令使用 / 设置键和值:
dotnet run /MyKey "Using /" /Position:Title=Cmd /Position:Name=Cmd_Rick
以下命令使用 -- 设置键和值:
dotnet run --MyKey "Using --" --Position:Title=Cmd --Position:Name=Cmd_Rick
键值:
- 必须后跟
=,或者当值后跟一个空格时,键必须具有一个--或/的前缀。 - 如果使用
=,则不是必需的。 例如MySetting=。
在同一命令中,请勿将使用 = 的命令行参数键值对与使用空格的键值对混合使用。
交换映射
交换映射支持键名替换逻辑。 提供针对 AddCommandLine 方法的交换替换字典。
当使用交换映射字典时,会检查字典中是否有与命令行参数提供的键匹配的键。 如果在字典中找到了命令行键,则会传回字典值将键值对设置为应用的配置。 对任何具有单划线 (-) 前缀的命令行键而言,交换映射都是必需的。
交换映射字典键规则:
- 交换必须以
-或--开头。 - 交换映射字典不得包含重复键。
若要使用交换映射字典,请将它传递到对 AddCommandLine 的调用中:
public class Program
{
    public static void Main(string[] args)
    {
        CreateHostBuilder(args).Build().Run();
    }

    public static IHostBuilder CreateHostBuilder(string[] args)
    {
        var switchMappings = new Dictionary<string, string>()
         {
             { "-k1", "key1" },
             { "-k2", "key2" },
             { "--alt3", "key3" },
             { "--alt4", "key4" },
             { "--alt5", "key5" },
             { "--alt6", "key6" },
         };

        return Host.CreateDefaultBuilder(args)
            .ConfigureAppConfiguration((hostingContext, config) =>
            {
                config.AddCommandLine(args, switchMappings);
            })
            .ConfigureWebHostDefaults(webBuilder =>
            {
                webBuilder.UseStartup<Startup>();
            });
    }
}
下面的代码显示了替换后的键的键值:
public class Test3Model : PageModel
{
    private readonly IConfiguration Config;

    public Test3Model(IConfiguration configuration)
    {
        Config = configuration;
    }

    public ContentResult OnGet()
    {
        return Content(
                $"Key1: '{Config["Key1"]}'\n" +
                $"Key2: '{Config["Key2"]}'\n" +
                $"Key3: '{Config["Key3"]}'\n" +
                $"Key4: '{Config["Key4"]}'\n" +
                $"Key5: '{Config["Key5"]}'\n" +
                $"Key6: '{Config["Key6"]}'");
    }
}
以下命令可用于测试键替换:
dotnet run -k1 value1 -k2 value2 --alt3=value2 /alt4=value3 --alt5 value5 /alt6 value6
对于使用交换映射的应用,调用 CreateDefaultBuilder 不应传递参数。 CreateDefaultBuilder 方法的 AddCommandLine 调用不包括映射的交换,并且无法将交换映射字典传递给 CreateDefaultBuilder。 解决方案不是将参数传递给 CreateDefaultBuilder,而是允许 ConfigurationBuilder 方法的 AddCommandLine 方法处理参数和交换映射字典。
在 Visual Studio 中设置环境和命令行参数
分层配置数据
配置 API 在配置键中使用分隔符来展平分层数据,以此来读取分层配置数据。
示例下载包含以下 appsettings.json 文件:
{
  "Position": {
    "Title": "Editor",
    "Name": "Joe Smith"
  },
  "MyKey":  "My appsettings.json Value",
  "Logging": {
    "LogLevel": {
      "Default": "Information",
      "Microsoft": "Warning",
      "Microsoft.Hosting.Lifetime": "Information"
    }
  },
  "AllowedHosts": "*"
}
以下来自示例下载的代码显示了一些配置设置:
public class TestModel : PageModel
{
    // requires using Microsoft.Extensions.Configuration;
    private readonly IConfiguration Configuration;

    public TestModel(IConfiguration configuration)
    {
        Configuration = configuration;
    }

    public ContentResult OnGet()
    {
        var myKeyValue = Configuration["MyKey"];
        var title = Configuration["Position:Title"];
        var name = Configuration["Position:Name"];
        var defaultLogLevel = Configuration["Logging:LogLevel:Default"];


        return Content($"MyKey value: {myKeyValue} \n" +
                       $"Title: {title} \n" +
                       $"Name: {name} \n" +
                       $"Default Log Level: {defaultLogLevel}");
    }
}
读取分层配置数据的首选方法是使用选项模式。 有关详细信息,请参阅本文档中的绑定分层配置数据。
GetSection 和 GetChildren 方法可用于隔离各个节和配置数据中某节的子节。 稍后将在 GetSection、GetChildren 和 Exists 中介绍这些方法。
配置键和值
配置键:
- 不区分大小写。 例如,
ConnectionString和connectionstring被视为等效键。 - 如果在多个配置提供程序中设置了某一键和值,则会使用最后添加的提供程序中的值。 有关详细信息,请参阅默认配置。
- 分层键
- 在配置 API 中,冒号分隔符 (
:) 适用于所有平台。 - 在环境变量中,冒号分隔符可能无法适用于所有平台。 所有平台均支持采用双下划线
__,并且它会自动转换为冒号:。 - 在 Azure Key Vault 中,分层键使用
--作为分隔符。 当机密加载到应用的配置中时,Azure Key Vault 配置提供程序 会自动将--替换为:。
- 在配置 API 中,冒号分隔符 (
- ConfigurationBinder 支持使用配置键中的数组索引将数组绑定到对象。 数组绑定将在将数组绑定到类部分中进行介绍。
配置值:
- 为字符串。
- NULL 值不能存储在配置中或绑定到对象。
连接字符串前缀
==TODO==
对于四个连接字符串环境变量,配置 API 具有特殊的处理规则。 这些连接字符串涉及了为应用环境配置 Azure 连接字符串。 使用默认配置或没有向 AddEnvironmentVariables 应用前缀时,具有表中所示前缀的环境变量将加载到应用中。
| 连接字符串前缀 | 提供程序 |
|---|---|
CUSTOMCONNSTR_ |
自定义提供程序 |
MYSQLCONNSTR_ |
MySQL |
SQLAZURECONNSTR_ |
Azure SQL 数据库 |
SQLCONNSTR_ |
SQL Server |
当发现环境变量并使用表中所示的四个前缀中的任何一个加载到配置中时:
- 通过删除环境变量前缀并添加配置键节 (
ConnectionStrings) 来创建配置键。 - 创建一个新的配置键值对,表示数据库连接提供程序(
CUSTOMCONNSTR_除外,它没有声明的提供程序)。
| 环境变量键 | 转换的配置键 | 提供程序配置条目 |
|---|---|---|
CUSTOMCONNSTR_{KEY} |
ConnectionStrings:{KEY} |
配置条目未创建。 |
MYSQLCONNSTR_{KEY} |
ConnectionStrings:{KEY} |
键:ConnectionStrings:{KEY}_ProviderName: 值:MySql.Data.MySqlClient |
SQLAZURECONNSTR_{KEY} |
ConnectionStrings:{KEY} |
键:ConnectionStrings:{KEY}_ProviderName: 值:System.Data.SqlClient |
SQLCONNSTR_{KEY} |
ConnectionStrings:{KEY} |
键:ConnectionStrings:{KEY}_ProviderName: 值:System.Data.SqlClient |
INI 配置提供程序
IniConfigurationProvider 在运行时从 INI 文件键值对加载配置。
以下代码会清除所有配置提供程序并添加多个配置提供程序:
public class Program
{
    public static void Main(string[] args)
    {
        CreateHostBuilder(args).Build().Run();
    }

    public static IHostBuilder CreateHostBuilder(string[] args) =>
        Host.CreateDefaultBuilder(args)
            .ConfigureAppConfiguration((hostingContext, config) =>
            {
                config.Sources.Clear();

                var env = hostingContext.HostingEnvironment;

                config.AddIniFile("MyIniConfig.ini", optional: true, reloadOnChange: true)
                      .AddIniFile($"MyIniConfig.{env.EnvironmentName}.ini",
                                     optional: true, reloadOnChange: true);

                config.AddEnvironmentVariables();

                if (args != null)
                {
                    config.AddCommandLine(args);
                }
            })
            .ConfigureWebHostDefaults(webBuilder =>
            {
                webBuilder.UseStartup<Startup>();
            });
}
在前面的代码中,MyIniConfig.ini 和 MyIniConfig.{Environment}.ini 文件中的设置会被以下提供程序中的设置替代:
示例下载包含以下 MyIniConfig.ini 文件:
MyKey="MyIniConfig.ini Value"

[Position]
Title="My INI Config title"
Name="My INI Config name"

[Logging:LogLevel]
Default=Information
Microsoft=Warning
以下来自示例下载的代码显示了上述的一些配置设置:
public class TestModel : PageModel
{
    // requires using Microsoft.Extensions.Configuration;
    private readonly IConfiguration Configuration;

    public TestModel(IConfiguration configuration)
    {
        Configuration = configuration;
    }

    public ContentResult OnGet()
    {
        var myKeyValue = Configuration["MyKey"];
        var title = Configuration["Position:Title"];
        var name = Configuration["Position:Name"];
        var defaultLogLevel = Configuration["Logging:LogLevel:Default"];


        return Content($"MyKey value: {myKeyValue} \n" +
                       $"Title: {title} \n" +
                       $"Name: {name} \n" +
                       $"Default Log Level: {defaultLogLevel}");
    }
}
JSON 配置提供程序
JsonConfigurationProvider 从 JSON 文件键值对加载配置。
重载可以指定:
- 文件是否可选。
- 如果文件更改,是否重载配置。
考虑下列代码:
public class Program
{
    public static void Main(string[] args)
    {
        CreateHostBuilder(args).Build().Run();
    }

    public static IHostBuilder CreateHostBuilder(string[] args) =>
        Host.CreateDefaultBuilder(args)
            .ConfigureAppConfiguration((hostingContext, config) =>
            {
                config.AddJsonFile("MyConfig.json",
                    optional: true,
                    reloadOnChange: true);
            })
            .ConfigureWebHostDefaults(webBuilder =>
            {
                webBuilder.UseStartup<Startup>();
            });
}
前面的代码:
- 通过以下选项将 JSON 配置提供程序配置为加载
MyConfig.json文件:optional: true:文件是可选的。reloadOnChange: true:保存更改后会重载文件。
- 读取
MyConfig.json文件之前的默认配置提供程序。MyConfig.json文件中的设置会替代默认配置提供程序中的设置,包括环境变量配置提供程序和命令行配置提供程序。
通常,你不会希望自定义 JSON 文件替代在环境变量配置提供程序和命令行配置提供程序中设置的值。
以下代码会清除所有配置提供程序并添加多个配置提供程序:
public class Program
{
    public static void Main(string[] args)
    {
        CreateHostBuilder(args).Build().Run();
    }

    public static IHostBuilder CreateHostBuilder(string[] args) =>
        Host.CreateDefaultBuilder(args)
            .ConfigureAppConfiguration((hostingContext, config) =>
            {
                config.Sources.Clear();

                var env = hostingContext.HostingEnvironment;

                config.AddJsonFile("appsettings.json", optional: true, reloadOnChange: true)
                      .AddJsonFile($"appsettings.{env.EnvironmentName}.json",
                                     optional: true, reloadOnChange: true);

                config.AddJsonFile("MyConfig.json", optional: true, reloadOnChange: true)
                      .AddJsonFile($"MyConfig.{env.EnvironmentName}.json",
                                     optional: true, reloadOnChange: true);

                config.AddEnvironmentVariables();

                if (args != null)
                {
                    config.AddCommandLine(args);
                }
            })
            .ConfigureWebHostDefaults(webBuilder =>
            {
                webBuilder.UseStartup<Startup>();
            });
}
在前面的代码中,MyConfig.json 和 MyConfig.Environment.json 文件中的设置:
- 会替代
appsettings.json和appsettings.{Environment}.json文件中的设置。 - 会被环境变量配置提供程序和命令行配置提供程序中的设置所替代。
示例下载包含以下 MyConfig.json 文件:
{
  "Position": {
    "Title": "My Config title",
    "Name": "My Config Smith"
  },
  "MyKey":  "MyConfig.json Value",
  "Logging": {
    "LogLevel": {
      "Default": "Information",
      "Microsoft": "Warning",
      "Microsoft.Hosting.Lifetime": "Information"
    }
  },
  "AllowedHosts": "*"
}
以下来自示例下载的代码显示了上述的一些配置设置:
public class TestModel : PageModel
{
    // requires using Microsoft.Extensions.Configuration;
    private readonly IConfiguration Configuration;

    public TestModel(IConfiguration configuration)
    {
        Configuration = configuration;
    }

    public ContentResult OnGet()
    {
        var myKeyValue = Configuration["MyKey"];
        var title = Configuration["Position:Title"];
        var name = Configuration["Position:Name"];
        var defaultLogLevel = Configuration["Logging:LogLevel:Default"];


        return Content($"MyKey value: {myKeyValue} \n" +
                       $"Title: {title} \n" +
                       $"Name: {name} \n" +
                       $"Default Log Level: {defaultLogLevel}");
    }
}
XML 配置提供程序
XmlConfigurationProvider 在运行时从 XML 文件键值对加载配置。
以下代码会清除所有配置提供程序并添加多个配置提供程序:
public class Program
{
    public static void Main(string[] args)
    {
        CreateHostBuilder(args).Build().Run();
    }

    public static IHostBuilder CreateHostBuilder(string[] args) =>
        Host.CreateDefaultBuilder(args)
            .ConfigureAppConfiguration((hostingContext, config) =>
            {
                config.Sources.Clear();

                var env = hostingContext.HostingEnvironment;

                config.AddXmlFile("MyXMLFile.xml", optional: true, reloadOnChange: true)
                      .AddXmlFile($"MyXMLFile.{env.EnvironmentName}.xml",
                                     optional: true, reloadOnChange: true);

                config.AddEnvironmentVariables();

                if (args != null)
                {
                    config.AddCommandLine(args);
                }
            })
            .ConfigureWebHostDefaults(webBuilder =>
            {
                webBuilder.UseStartup<Startup>();
            });
}
在前面的代码中,MyXMLFile.xml 和 MyXMLFile.{Environment}.xml 文件中的设置会被以下提供程序中的设置替代:
示例下载包含以下 MyXMLFile.xml 文件:
<?xml version="1.0" encoding="utf-8" ?>
<configuration>
  <MyKey>MyXMLFile Value</MyKey>
  <Position>
    <Title>Title from  MyXMLFile</Title>
    <Name>Name from MyXMLFile</Name>
  </Position>
  <Logging>
    <LogLevel>
      <Default>Information</Default>
      <Microsoft>Warning</Microsoft>
    </LogLevel>
  </Logging>
</configuration>
以下来自示例下载的代码显示了上述的一些配置设置:
public class TestModel : PageModel
{
    // requires using Microsoft.Extensions.Configuration;
    private readonly IConfiguration Configuration;

    public TestModel(IConfiguration configuration)
    {
        Configuration = configuration;
    }

    public ContentResult OnGet()
    {
        var myKeyValue = Configuration["MyKey"];
        var title = Configuration["Position:Title"];
        var name = Configuration["Position:Name"];
        var defaultLogLevel = Configuration["Logging:LogLevel:Default"];


        return Content($"MyKey value: {myKeyValue} \n" +
                       $"Title: {title} \n" +
                       $"Name: {name} \n" +
                       $"Default Log Level: {defaultLogLevel}");
    }
}
如果使用 name 属性来区分元素,则使用相同元素名称的重复元素可以正常工作:
<?xml version="1.0" encoding="UTF-8"?>
<configuration>
  <section name="section0">
    <key name="key0">value 00</key>
    <key name="key1">value 01</key>
  </section>
  <section name="section1">
    <key name="key0">value 10</key>
    <key name="key1">value 11</key>
  </section>
</configuration>
以下代码会读取前面的配置文件并显示键和值:
public class IndexModel : PageModel
{
    private readonly IConfiguration Configuration;

    public IndexModel(IConfiguration configuration)
    {
        Configuration = configuration;
    }

    public ContentResult OnGet()
    {
        var key00 = "section:section0:key:key0";
        var key01 = "section:section0:key:key1";
        var key10 = "section:section1:key:key0";
        var key11 = "section:section1:key:key1";

        var val00 = Configuration[key00];
        var val01 = Configuration[key01];
        var val10 = Configuration[key10];
        var val11 = Configuration[key11];

        return Content($"{key00} value: {val00} \n" +
                       $"{key01} value: {val01} \n" +
                       $"{key10} value: {val10} \n" +
                       $"{key10} value: {val11} \n"
                       );
    }
}
属性可用于提供值:
<?xml version="1.0" encoding="UTF-8"?>
<configuration>
  <key attribute="value" />
  <section>
    <key attribute="value" />
  </section>
</configuration>
以前的配置文件使用 value 加载以下键:
- key:attribute
section:key:attribute
Key-per-file 配置提供程序
KeyPerFileConfigurationProvider 使用目录的文件作为配置键值对。 该键是文件名。 该值包含文件的内容。 Key-per-file 配置提供程序用于 Docker 托管方案。
若要激活 Key-per-file 配置,请在 ConfigurationBuilder 的实例上调用 AddKeyPerFile 扩展方法。 文件的 directoryPath 必须是绝对路径。
重载允许指定:
- 配置源的
Action<KeyPerFileConfigurationSource>委托。 - 目录是否可选以及目录的路径。
双下划线字符 (__) 用作文件名中的配置键分隔符。 例如,文件名 Logging__LogLevel__System 生成配置键 Logging:LogLevel:System。
构建主机时调用 ConfigureAppConfiguration 以指定应用的配置:
.ConfigureAppConfiguration((hostingContext, config) =>
{
    var path = Path.Combine(
        Directory.GetCurrentDirectory(), "path/to/files");
    config.AddKeyPerFile(directoryPath: path, optional: true);
})
内存配置提供程序
MemoryConfigurationProvider 使用内存中集合作为配置键值对。
以下代码将内存集合添加到配置系统中:
public class Program
{
    public static void Main(string[] args)
    {
        CreateHostBuilder(args).Build().Run();
    }

    public static IHostBuilder CreateHostBuilder(string[] args)
    {
        var Dict = new Dictionary<string, string>
        {
           {"MyKey", "Dictionary MyKey Value"},
           {"Position:Title", "Dictionary_Title"},
           {"Position:Name", "Dictionary_Name" },
           {"Logging:LogLevel:Default", "Warning"}
        };

        return Host.CreateDefaultBuilder(args)
            .ConfigureAppConfiguration((hostingContext, config) =>
            {
                config.AddInMemoryCollection(Dict);
            })
            .ConfigureWebHostDefaults(webBuilder =>
            {
                webBuilder.UseStartup<Startup>();
            });
    }
}
以下来自示例下载的代码显示了上述配置设置:
public class TestModel : PageModel
{
    // requires using Microsoft.Extensions.Configuration;
    private readonly IConfiguration Configuration;

    public TestModel(IConfiguration configuration)
    {
        Configuration = configuration;
    }

    public ContentResult OnGet()
    {
        var myKeyValue = Configuration["MyKey"];
        var title = Configuration["Position:Title"];
        var name = Configuration["Position:Name"];
        var defaultLogLevel = Configuration["Logging:LogLevel:Default"];


        return Content($"MyKey value: {myKeyValue} \n" +
                       $"Title: {title} \n" +
                       $"Name: {name} \n" +
                       $"Default Log Level: {defaultLogLevel}");
    }
}
在前面的代码中,config.AddInMemoryCollection(Dict) 会被添加到默认配置提供程序之后。 有关对配置提供程序进行排序的示例,请参阅 JSON 配置提供程序。
有关使用 MemoryConfigurationProvider 的其他示例,请参阅绑定数组。
GetValue
ConfigurationBinder.GetValue 从配置中提取一个具有指定键的值,并将它转换为指定的类型。 此方法是 IConfiguration 的扩展方法:
public class TestNumModel : PageModel
{
    private readonly IConfiguration Configuration;

    public TestNumModel(IConfiguration configuration)
    {
        Configuration = configuration;
    }

    public ContentResult OnGet()
    {
        var number = Configuration.GetValue<int>("NumberKey", 99);
        return Content($"{number}");
    }
}
在前面的代码中,如果在配置中找不到 NumberKey,则使用默认值 99。
GetSection、GetChildren 和 Exists
对于下面的示例,请考虑以下 MySubsection.json 文件:
{
  "section0": {
    "key0": "value00",
    "key1": "value01"
  },
  "section1": {
    "key0": "value10",
    "key1": "value11"
  },
  "section2": {
    "subsection0": {
      "key0": "value200",
      "key1": "value201"
    },
    "subsection1": {
      "key0": "value210",
      "key1": "value211"
    }
  }
}
以下代码将 MySubsection.json 添加到配置提供程序:
public class Program
{
    public static void Main(string[] args)
    {
        CreateHostBuilder(args).Build().Run();
    }

    public static IHostBuilder CreateHostBuilder(string[] args) =>
        Host.CreateDefaultBuilder(args)
            .ConfigureAppConfiguration((hostingContext, config) =>
            {
                config.AddJsonFile("MySubsection.json",
                    optional: true,
                    reloadOnChange: true);
            })
            .ConfigureWebHostDefaults(webBuilder =>
            {
                webBuilder.UseStartup<Startup>();
            });
}
GetSection
IConfiguration.GetSection 会返回具有指定子节键的配置子节。
以下代码将返回 section1 的值:
public class TestSectionModel : PageModel
{
    private readonly IConfiguration Config;

    public TestSectionModel(IConfiguration configuration)
    {
        Config = configuration.GetSection("section1");
    }

    public ContentResult OnGet()
    {
        return Content(
                $"section1:key0: '{Config["key0"]}'\n" +
                $"section1:key1: '{Config["key1"]}'");
    }
}
以下代码将返回 section2:subsection0 的值:
public class TestSection2Model : PageModel
{
    private readonly IConfiguration Config;

    public TestSection2Model(IConfiguration configuration)
    {
        Config = configuration.GetSection("section2:subsection0");
    }

    public ContentResult OnGet()
    {
        return Content(
                $"section2:subsection0:key0 '{Config["key0"]}'\n" +
                $"section2:subsection0:key1:'{Config["key1"]}'");
    }
}
GetSection 永远不会返回 null。 如果找不到匹配的节,则返回空 IConfigurationSection。
当 GetSection 返回匹配的部分时,Value 未填充。 存在该部分时,返回一个 Key 和 Path 部分。
GetChildren 和 Exists
以下代码将调用 IConfiguration.GetChildren 并返回 section2:subsection0 的值:
public class TestSection4Model : PageModel
{
    private readonly IConfiguration Config;

    public TestSection4Model(IConfiguration configuration)
    {
        Config = configuration;
    }

    public ContentResult OnGet()
    {
        string s = null;
        var selection = Config.GetSection("section2");
        if (!selection.Exists())
        {
            throw new System.Exception("section2 does not exist.");
        }
        var children = selection.GetChildren();

        foreach (var subSection in children)
        {
            int i = 0;
            var key1 = subSection.Key + ":key" + i++.ToString();
            var key2 = subSection.Key + ":key" + i.ToString();
            s += key1 + " value: " + selection[key1] + "\n";
            s += key2 + " value: " + selection[key2] + "\n";
        }
        return Content(s);
    }
}
前面的代码将调用 ConfigurationExtensions.Exists 以验证该节是否存在:
绑定数组
ConfigurationBinder.Bind 支持使用配置键中的数组索引将数组绑定到对象。 公开数值键段的任何数组格式都能够与 POCO 类数组进行数组绑定。
请考虑示例下载中的 MyArray.json:
{
  "array": {
    "entries": {
      "0": "value00",
      "1": "value10",
      "2": "value20",
      "4": "value40",
      "5": "value50"
    }
  }
}
以下代码将 MyArray.json 添加到配置提供程序:
public class Program
{
    public static void Main(string[] args)
    {
        CreateHostBuilder(args).Build().Run();
    }

    public static IHostBuilder CreateHostBuilder(string[] args) =>
        Host.CreateDefaultBuilder(args)
            .ConfigureAppConfiguration((hostingContext, config) =>
            {
                config.AddJsonFile("MyArray.json",
                    optional: true,
                    reloadOnChange: true);
            })
            .ConfigureWebHostDefaults(webBuilder =>
            {
                webBuilder.UseStartup<Startup>();
            });
}
以下代码将读取配置并显示值:
public class ArrayModel : PageModel
{
    private readonly IConfiguration Config;
    public ArrayExample _array { get; private set; }

    public ArrayModel(IConfiguration config)
    {
        Config = config;
    }

    public ContentResult OnGet()
    {
        _array = Config.GetSection("array").Get<ArrayExample>();
        string s = null;

        for (int j = 0; j < _array.Entries.Length; j++)
        {
            s += $"Index: {j}  Value:  {_array.Entries[j]} \n";
        }

        return Content(s);
    }
}
前面的代码会返回以下输出:
Index: 0  Value: value00
Index: 1  Value: value10
Index: 2  Value: value20
Index: 3  Value: value40
Index: 4  Value: value50
在前面的输出中,索引 3 具有值 value40,与 MyArray.json 中的 "4": "value40", 相对应。 绑定的数组索引是连续的,并且未绑定到配置键索引。 配置绑定器不能绑定 NULL 值,也不能在绑定的对象中创建 NULL 条目
以下代码将通过 AddInMemoryCollection 扩展方法加载 array:entries 配置:
public class Program
{
    public static void Main(string[] args)
    {
        CreateHostBuilder(args).Build().Run();
    }

    public static IHostBuilder CreateHostBuilder(string[] args)
    {
        var arrayDict = new Dictionary<string, string>
        {
            {"array:entries:0", "value0"},
            {"array:entries:1", "value1"},
            {"array:entries:2", "value2"},
            //              3   Skipped
            {"array:entries:4", "value4"},
            {"array:entries:5", "value5"}
        };

        return Host.CreateDefaultBuilder(args)
            .ConfigureAppConfiguration((hostingContext, config) =>
            {
                config.AddInMemoryCollection(arrayDict);
            })
            .ConfigureWebHostDefaults(webBuilder =>
            {
                webBuilder.UseStartup<Startup>();
            });
    }
}
以下代码将读取 arrayDict``Dictionary 中的配置并显示值:
public class ArrayModel : PageModel
{
    private readonly IConfiguration Config;
    public ArrayExample _array { get; private set; }

    public ArrayModel(IConfiguration config)
    {
        Config = config;
    }

    public ContentResult OnGet()
    {
        _array = Config.GetSection("array").Get<ArrayExample>();
        string s = null;

        for (int j = 0; j < _array.Entries.Length; j++)
        {
            s += $"Index: {j}  Value:  {_array.Entries[j]} \n";
        }

        return Content(s);
    }
}
前面的代码会返回以下输出:
Index: 0  Value: value0
Index: 1  Value: value1
Index: 2  Value: value2
Index: 3  Value: value4
Index: 4  Value: value5
绑定对象中的索引 #3 保留 array:4 配置键的配置数据及其值 value4。 当绑定包含数组的配置数据时,配置键中的数组索引用于在创建对象时迭代配置数据。 无法在配置数据中保留 null 值,并且当配置键中的数组跳过一个或多个索引时,不会在绑定对象中创建 null 值条目。
可以在由任何读取索引 #3 键/值对的配置提供程序绑定到 ArrayExample 实例之前提供索引 #3 的缺失配置项。 请考虑示例下载中的以下 Value3.json 文件:
{
  "array:entries:3": "value3"
}
以下代码包含 Value3.json 和 arrayDict``Dictionary 的配置:
public class Program
{
    public static void Main(string[] args)
    {
        CreateHostBuilder(args).Build().Run();
    }

    public static IHostBuilder CreateHostBuilder(string[] args)
    {
        var arrayDict = new Dictionary<string, string>
        {
            {"array:entries:0", "value0"},
            {"array:entries:1", "value1"},
            {"array:entries:2", "value2"},
            //              3   Skipped
            {"array:entries:4", "value4"},
            {"array:entries:5", "value5"}
        };

        return Host.CreateDefaultBuilder(args)
            .ConfigureAppConfiguration((hostingContext, config) =>
            {
                config.AddInMemoryCollection(arrayDict);
                config.AddJsonFile("Value3.json",
                                    optional: false, reloadOnChange: false);
            })
            .ConfigureWebHostDefaults(webBuilder =>
            {
                webBuilder.UseStartup<Startup>();
            });
    }
}
以下代码将读取上述配置并显示值:
public class ArrayModel : PageModel
{
    private readonly IConfiguration Config;
    public ArrayExample _array { get; private set; }

    public ArrayModel(IConfiguration config)
    {
        Config = config;
    }

    public ContentResult OnGet()
    {
        _array = Config.GetSection("array").Get<ArrayExample>();
        string s = null;

        for (int j = 0; j < _array.Entries.Length; j++)
        {
            s += $"Index: {j}  Value:  {_array.Entries[j]} \n";
        }

        return Content(s);
    }
}
前面的代码会返回以下输出:
Index: 0  Value: value0
Index: 1  Value: value1
Index: 2  Value: value2
Index: 3  Value: value3
Index: 4  Value: value4
Index: 5  Value: value5
不需要自定义配置提供程序实现数组绑定。
自定义配置提供程序==TODO==
访问 Startup 中的配置
以下代码显示 Startup 方法中的配置数据:
public class Startup
{
    public Startup(IConfiguration configuration)
    {
        Configuration = configuration;
    }

    public IConfiguration Configuration { get; }

    public void ConfigureServices(IServiceCollection services)
    {
        services.AddRazorPages();
        Console.WriteLine($"MyKey : {Configuration["MyKey"]}");
    }

    public void Configure(IApplicationBuilder app, IWebHostEnvironment env)
    {
        Console.WriteLine($"Position:Title : {Configuration["Position:Title"]}");

        if (env.IsDevelopment())
        {
            app.UseDeveloperExceptionPage();
        }
        else
        {
            app.UseExceptionHandler("/Error");
            app.UseHsts();
        }

        app.UseHttpsRedirection();
        app.UseStaticFiles();

        app.UseRouting();

        app.UseAuthorization();

        app.UseEndpoints(endpoints =>
        {
            endpoints.MapRazorPages();
        });
    }
}
有关使用启动便捷方法访问配置的示例,请参阅应用启动:便捷方法。
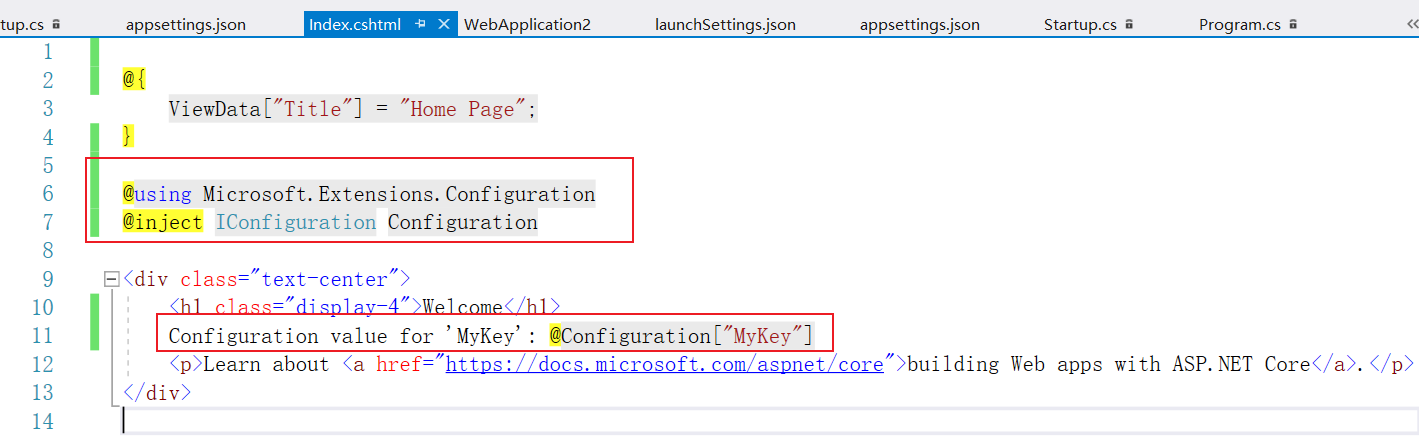
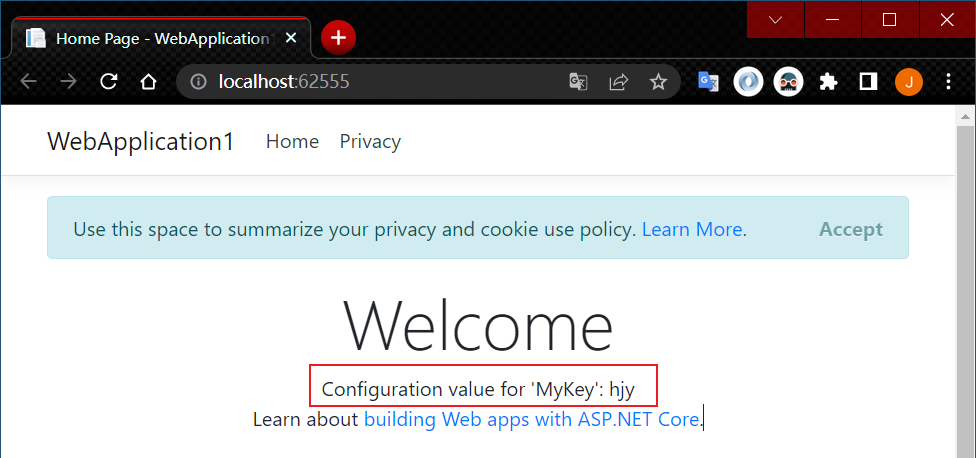
访问 Razor Pages 中的配置
以下代码显示 Razor Pages 中的配置数据:
@page
@model Test5Model
@using Microsoft.Extensions.Configuration
@inject IConfiguration Configuration

Configuration value for 'MyKey': @Configuration["MyKey"]
在以下代码中,MyOptions 已通过 Configure 被添加到了服务容器并已绑定到了配置:
public void ConfigureServices(IServiceCollection services)
{
    services.Configure<MyOptions>(Configuration.GetSection("MyOptions"));

    services.AddRazorPages();
}
以下标记使用 @injectRazor 指令来解析和显示选项值:
@page
@model SampleApp.Pages.Test3Model
@using Microsoft.Extensions.Options
@inject IOptions<MyOptions> optionsAccessor


<p><b>Option1:</b> @optionsAccessor.Value.Option1</p>
<p><b>Option2:</b> @optionsAccessor.Value.Option2</p>
访问 MVC 视图文件中的配置
以下代码显示 MVC 视图中的配置数据:
@using Microsoft.Extensions.Configuration
@inject IConfiguration Configuration

Configuration value for 'MyKey': @Configuration["MyKey"]
使用委托来配置选项
在委托中配置的选项替代在配置提供程序中设置的值。
示例应用中的示例 2 展示了如何使用委托来配置选项。
在以下代码中,向服务容器添加了 IConfigureOptions 服务。 它使用委托来配置 MyOptions 的值:
public void ConfigureServices(IServiceCollection services)
{
    services.Configure<MyOptions>(myOptions =>
    {
        myOptions.Option1 = "Value configured in delegate";
        myOptions.Option2 = 500;
    });

    services.AddRazorPages();
}
以下代码显示选项值:
public class Test2Model : PageModel
{
    private readonly IOptions<MyOptions> _optionsDelegate;

    public Test2Model(IOptions<MyOptions> optionsDelegate )
    {
        _optionsDelegate = optionsDelegate;
    }

    public ContentResult OnGet()
    {
        return Content($"Option1: {_optionsDelegate.Value.Option1} \n" +
                       $"Option2: {_optionsDelegate.Value.Option2}");
    }
}
在前面的示例中,Option1 和 Option2 的值在 appsettings.json 中指定,然后被配置的委托替代。
选项
[使用选项模式绑定分层配置数据](#### 使用选项模式绑定分层配置数据)